<=Main Page 
A Real Theremin

RS Optermen I


Photo-Transistor - 100% Radio Shack (This needs update)

Visit Optermen II - Opto-VCO

With Pitch & Volume Control, this simple new approach is the engine for a Theremin Cello, Tannerin &  Ondes Martenot

.

Optermen I: Here is audio Sample1 .mp3 (176k ) this is exposure to natural daylight in my well lit room. This Optical is not very musical or playable like a true theremin.

Lights will add their own type of cool distortion, here is audio Sample2 .mp3 (113k). This is my fluorescent light magnifying glass getting near the sensor.

There is no Sound in Total Darkness!
The square wave pitch rises with the light level.

The power consumption of the circuit is extremely low. If you use this circuit to drive a mini amplified computer speaker input the optical circuits "AA" batteries would last years..  

Video of the RS Optical Theremin Performance by
farnea
on Jan 7, 2008 in tech

Using the DIY RS Optical Theremin pitch enhanced with the RS Sixth Voice, a GameBoy Advance SP as a drum box and some strobo leds.


Try these video's

Optermen-1

Optermen- 2

Optermen- 3

Note: Q1 & Q2 could be replaced with a single CdS LDR light dependant resistor removed from a bathroom night light.
Etch your own PC Board Info
or use the generic board.


Board size 1.6" x 1.8" (40mm x 45mm)   


PDF (168k)  <= Etch your board using this file.
This is simple enough you should do just fine!

.
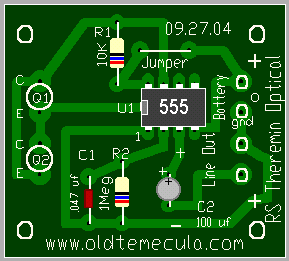
The phototransistors physically mount in parallel but opposite connections of one another.  Look for the fat internal lead (collector)  A CdS cell can be used in place of the photo-transistors but it will not give you as much low end octave range.

You need a black plastic sleeve around the phototransistors to block the light coming from the sides. This will make the light exposure more directional toward the phototransistors front lenses . Thanks Newbie3

When constructing make certain the electrolytic capacitor negative side is faced away from the IC.

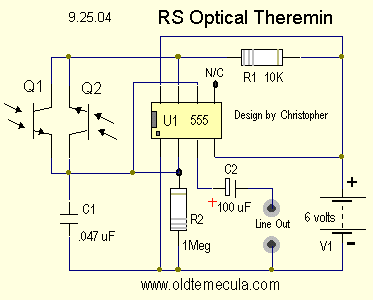
Line out can connect to a medium size speaker directly without needing an amplifier.


Experiment: To modulate and drive a super bright LED then replace C2 with a 220 ohm 1/4 watt resistor and properly attach the +/- LED wires to the line out terminals. Pick up the sound remotely up to three feet away using a photo-transistor or a optical remote sensor. This also creates a volume control method.


Experiment: A triangular waveform which creates a better tone is generated at pins 2 & 6 which is the top connection of C1 of the 555. This can be made useable by tapping off here and driving the high impedance input of an additional Op-Amp like a TL082.
This Op-Amp is needed for isolation of the triangular wave to avoid loading down the performance of the 555 circuit.


Experiment: New one at the bottom of this page as of 4.21.15 - I will breadboard it eventually, it should end up giving a nice result. It adds a few more components onto the original design.

  Value Quan. Radio Shack Part# Price Packs Total Special Notes
Q1, Q2 Phototransistor 2 276-145 1.59 2 3.18  
  CdS Photo Cell use 1 <= A Substitute for

Q1

 Q2   < Remove from bathroom night light
U1  TLC555 1 276-1718 1.69 1 1.69  
C1  .047 uf 1 272-1068 1.29 1 1.29 Pack has two
C2  100 uf 1 272-1044 1.29 1 1.29  
R1  10 K 1 271-1335 
or  271-1126 
.99 1 .99 brown-black-orange-gold
R2  1 Meg 1 271-1356 
or  271-1134
.99 1 .99 brown-black-green-gold
 
Misc.
IC Sockets 8 Pin 1 276-1995 0.69 1 0.69 Use a Socket !
PC Board Generic 1 276-159 2.29 1 2.29 Pack has two or use PDF (168k) 
V1 Battery 4 AA Holder 1 270-409 1.89 1 1.89 Switch in Battery Holder
Line Out PC Board Term. 1 276-1388 2.29 1 xx Optional Pack of 4 
Enclosure 4x2x1 1 270-1802 2.69 1 xx Optional Box
 Prices as of Sept. 25, 2004    US Dollars  Total = $14.30 <=Batteries Not Included (-;

.