|
These are
the BASIC parts used for both Pitch & Volume Control
At first we will have a
Pitch Only board with a whistle out at Out-2B
There is enough info on this graphic to stuff the step #1
basic parts used for both Pitch
or Volume Control

The Antenna starts at
the PCB, use a 6" to 18" temporary stiff wire antenna for testing.
Retuning is necessary with antenna changes.
I am using
the Ant2 connection currently for the antenna.
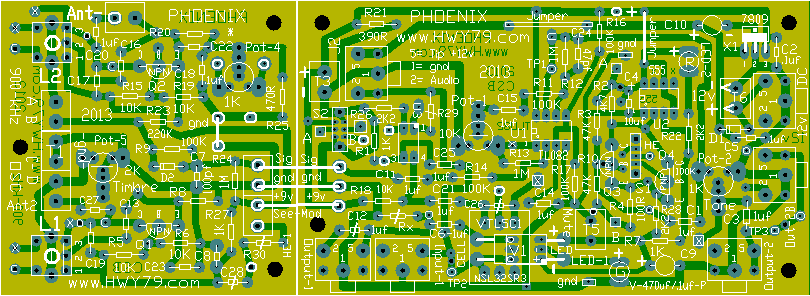
Do Not snap apart the
3 x 3
section, it is much more practical to build
and use the board as one piece.
Leave off
R25-470R
on both volume and pitch boards. The transistors I now use needs more
range for tuning.
The RF mixing diode D2
on the 3 x 3 section is forward biased through Pot-5-100K and the R24-1
Meg resistor.
The parts displayed as a
skeleton graphic
are also installed. Note the 8 jumper wires installed, do before
testing the boards.
The two boards can only be
tested with Pot-4
installed or mount a Terminal here for a remotely mounted Pot, this can use a twisted pair of wires up to 10'
away. For testing place a 470 ohm resistor across the terminal. Do
not mount R25.
Unless otherwise stated,
the parts on the pcb that have a line
through them are
not installed unless stated elsewhere.
Pitch
Board
Only |
Freq
= ~900khz |
C17
& C19 = 47pf |
R12 =
1Meg |
Uses
Ant- |
C25
- 1uf |
R7
= 470R |
R25 =
None |
C9 =
.1uf |
| Transformer |
T5 = None |
LED-1
None |
LED-2
Red |
Switch-1 |
ABCD
= |
|
| U3
- V0618a |
R1
- 1K |
R26
- 2K2 |
R29
- 2.2K |
Pot-5
= 100K |
Jumper
Wires |
R31
& C29 custom
filtering |
| The
Board Differences |
S1
- not installed |
S2
- not installed |
|
Pot-5
Controls the RF mix |
|
Volume
Board
Only |
Freq
= ~750khz |
C17
& C19 = 100pf |
R12 =
47K |
Uses
Ant2 |
Switch-1 |
Pot-5
= 100K |
R25 =
None |
C9 =
470uf |
| Vactrol
- VTL5C1 |
T5 =
Mute Terminal |
LED-1
Green |
LED-2
Red |
C6-1uf |
ABCD
= |
|
| U3 - None |
R1 - None |
R26 -
None |
R29 -
None |
C25 -
None |
R7
= 470R |
|
|
| Read Setting
up the Spiky Waveform |
Special Notes:
See Modifications,
use the purple wire to send the Output-1 signal to Out-2B on the Volume
board. Only use the three end TRS jacks.
Mount R7
- 470R with
1/4" wire up from board on the side facing toward Out-2B. This makes
for an excellent test clip point.
Mount
C10 - 470
uf
with
1/2" long leads above the board so it can be moved out of the
way of J2 plug passing by.
The TLO82
& TLC555
work fine, today I prefer swapping in the LM358
& NE555.
Mount IC sockets!
Under board ground
plate PDF.
This is under the fixed Pitch
oscillator only side for wave shape,
also can extend under U1
to shield against noise. Do not have under under L2. This is
not used
on the Volume control board.
Stuff the
3 x 3 section left side of boards first.
2 hour
total construction time
for the two 3 x 3 sections.
The complete electronic build could be done 8 hours.
Mount the board stand-offs.
Always stuff the resistors with the gold band on the right side.
For the RF oscillators use
MPS-A42
transistors, by experiment these work the best!
Separate out the parts used for the 3 x 3 osc board.
T1 x 3, Ant and HE-1 are
six terminal blocks total.
Below is both boards:
Mount these first to avoid confusion C7,
C8
= 100pf
- C2 & C5
& C18, C20 &
C27 = .1uf
C13,
C16, C22, C23 = 47pf
R8 & R20 =
4.7k yellow,
violet, red, gold (emitter resistor) R9 = 100k
brown, black, yellow, gold
R5, R6, R15
& R19 = 10k
brown, black, orange, gold
R23 = 220k
red, red, black, orange, brown = 2%
R7-1K
was changed to
R7-470 ohms, this allow a louder volume no hand near the loop.
R12-1Meg
was changed to 47K for less gain.
A terminal
can be placed at Pot-4
so twisted wires can connect to a remotely mounted tuning Pot-4
up to 10' away.
Pot-4 -
1K used for tuning for the Null point.
View the 3 x 3
Stuffed Parts for Testing and Heterodyning.
Do this test after stuffing the 3 x 3 osc section, it is exciting!
Parts below
are on
5.2 x 3 board section
(Right
half of board)
Mount the IC
Sockets
C2, C5 =
.1
uf The jacks may get in the way so mount these
two first. C10 =
470 uf
R21
=
470
ohms @
1/2 watt
both boards, this adds a little extra load to
the
7809 voltage regulator.
Pot-1 10k
and Pot-2 1k
are on board trimmers
used on the Pitch & Volume boards adjusted to 1/2 CW at first.
Mount the
three TRS
stereo jacks. A dimple should be drilled
just above the #1 View
TRS info here
Jumper Wires
- Their are 8
total per board. The +9v wire has a modification
that is highly recommended for the Pitch board only for better power supply
filtering (R31
& C29) for the
RF oscillators which will create the cleanest sound.
Don't forget to add the three
jumper wires at the score to
connect the 3 x 3 & 5.2 x 3 sections.
The 7809
metal side faces away from the board. This should never be hot, set your
wall-wart on 9v instead of 12v and check if the theremin still works
properly. The theremin load is so low the wall-wart might operate higher
in voltage.
Verify the LED
polarity
direction before mounting, use a 1K resistor inline with a 9 volt
battery.
Power
a single board with 12
volts at terminal T6
and pass this
+V
to the other basic board using a TRS stereo cable from J2
to J2 on the other
board. The theremin tone
does not pass
from the
J2-Jack
to the other board yet, just power.
The Red LED should briefly
flash it they are mounted correctly. When tuned the Red LED will glow when
an audio signal is heard even above human hearing. This makes it great for
visual tuning once you see how this works.
The theremin pitch audio tone
should be found at
Out-2B
TRS Jack
"after" you complete this webpage.
Visit custom
mods & needed wiring for the transformer and passing the audio
signal through the J2-jack.
.
|